Building a Discord Chatbot with Python (9) - Adding Interactive Buttons to Chat Messages
In this installment, we’ll dive deeply into how to add interactive buttons to your chat messages in Discord. Additionally, we’ll explore the variety of responses you can trigger when these buttons are pressed.
About Message Components
Discord provides a framework for adding “message components” (or simply “components”), which are interactive elements you can place within chat messages.
(See: Message Components)
This feature enables the incorporation of various interactive elements, such as buttons and select menus, into your chat messages.
In discord.py, these functionalities are housed under discord.ui.
(See: Bot UI Kit)
1. Adding Buttons
Let’s jump right in and use discord.ui to place buttons in a chat message.
To add a component to a message, you first create an instance of discord.ui.View.
Then, you use the add_item method to attach the component to this View instance.
Let’s start by creating a !button command that will output a message with an “OK” button.
-
commands/button.pyfrom discord.ext import commands from discord import ui @commands.command(name='button') async def button_command(ctx: commands.Context): """Sends a chat message that includes an 'OK' button.""" view = ui.View() # Create a View instance button = ui.Button(label='OK') # Create a Button instance view.add_item(button) # Add the Button to the View await ctx.send(view=view) # Send the message with the attached View -
chatbot.py... from commands.quiz import quiz_command from commands.button import button_command BOT_COMMANDS = [omikuji_command, quiz_command, button_command] ...
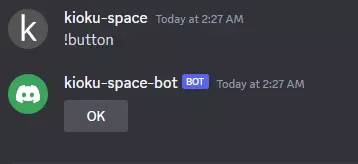
After making these configurations, run your chatbot and execute the !button command.
You should see a message with an “OK” button attached to it.
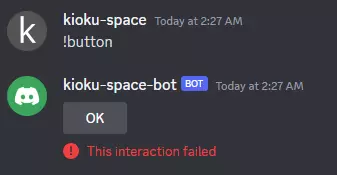
If you press the button, since no action has been defined yet, you’ll get a “This interaction failed” message.
2. Defining Button Behavior
Next, let’s define what happens when the button is pressed.
2.1. Creating a Class Extending ui.Button
discord.py offers multiple ways to define button behaviors.
For this guide, we’ll create a custom class that extends ui.Button.
Start by creating a class called OKButton that inherits from ui.Button.
class OKButton(ui.Button):
    ...
2.2. Defining the __init__ Method
Next, in the __init__ method of this class, set the default label as “OK.”
class OKButton(ui.Button):
    def __init__(self, *, label='OK', **kwargs):
        super().__init__(label=label, **kwargs)
2.3. Defining the callback Method
Next, let’s discuss defining the callback method, which is triggered when a button is pressed. This is a coroutine function. The method takes an Interaction type object as its second argument, which represents the interaction event.
(See: API Reference)
from discord import ui, Interaction
...
class OKButton(ui.Button):
    ...
    async def callback(self, interaction: Interaction):
        ...
Next, let’s see a variety of responses.
In the callback method, you are required to send only one response to the triggered interaction.
You cannot send multiple responses, and the response must be returned within 3 seconds.
2.3.1. Replying to Messages with interaction.response.send_message
The interaction.response.send_message coroutine allows you to reply to the message where the component (button) is placed. Here’s an example that sends a reply saying, “OK button was pressed.”
class OKButton(ui.Button):
    ...
    async def callback(self, interaction: Interaction):
        await interaction.response.send_message("OK button was pressed.")
(See: 2.5.1. Using send_message for Responses)
2.3.2. Editing Messages with interaction.response.edit_message
If you’d rather edit the original message instead of sending a new one, use the interaction.response.edit_message coroutine. The following example modifies the original message to say, “OK button was pressed.”
class OKButton(ui.Button):
    ...
    async def callback(self, interaction: Interaction):
        await interaction.response.edit_message(content="OK button was pressed.")
(See: 2.5.2. Using edit_message for Responses)
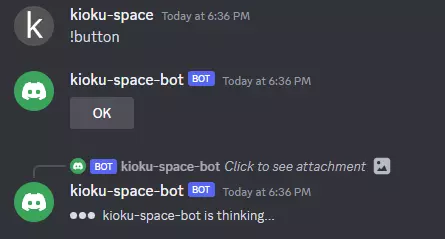
2.3.3. Using interaction.response.defer for Delayed Responses
Sometimes, tasks can take a long time to complete. Because you’re required to send a response within 3 seconds, you can use interaction.response.defer to provide a temporary response before commencing with a longer task.
For instance, if you want to indicate that the bot is “thinking,” set thinking=True.
(See: API Reference)
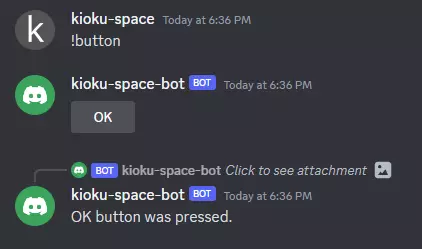
Here’s an example that delays the response by 10 seconds before saying, “OK button was pressed.”
(We’ll explain interaction.followup later.)
import asyncio
...
class OKButton(ui.Button):
    ...
    async def callback(self, interaction: Interaction):
        await interaction.response.defer(thinking=True)
        await asyncio.sleep(10)
        await interaction.followup.send(content="OK button was pressed.")
        self.view.stop()
(See: 2.5.3. Using defer for Delayed Responses)
2.4. Modifying Commands to Use the Created Button
Lastly, we’ll adapt the button_command to use our created OKButton.
@commands.command(name='button')
async def button_command(ctx: commands.Context):
    """Sends a chat message that includes an 'OK' button."""
    view = ui.View()
    button = OKButton()
    view.add_item(button)
    await ctx.send(view=view)
2.5. Testing the Bot
Once your chatbot is running, try typing the !button command and press the displayed button to check how it works.
2.5.1. Using send_message for Responses
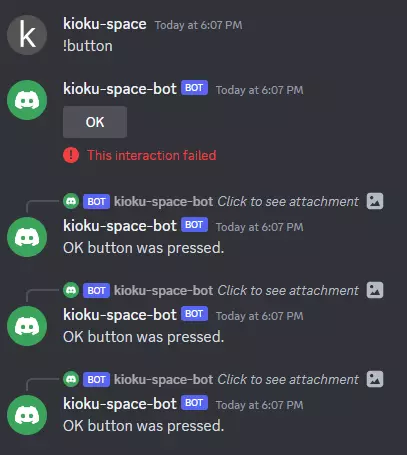
When the interaction.response.send_message method is implemented as 2.3.1, a new reply is generated each time the button is pressed.
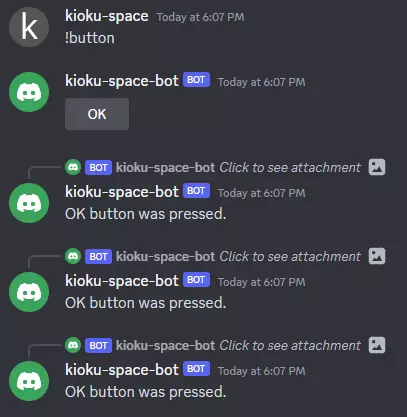
However, if the button is pressed again after some time, it will display “This interaction failed,” and no reply will be sent.
2.5.1.1. Disabling Multiple Interactions
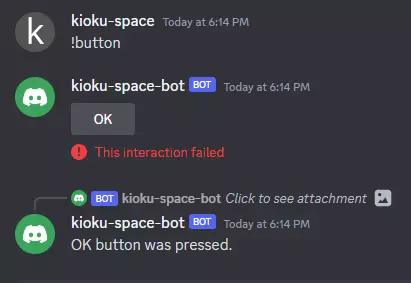
If you want the button to be a one-time clickable event, you can stop the View in the button’s callback method. This will disable further interactions.
class OKButton(ui.Button):
    ...
    async def callback(self, interaction: Interaction):
        await interaction.response.send_message("OK button was pressed.")
        self.view.stop()
After making these changes, any second attempt to interact will fail, displaying the message ‘This interaction failed.’
2.5.1.2. Preventing Timeout Failures
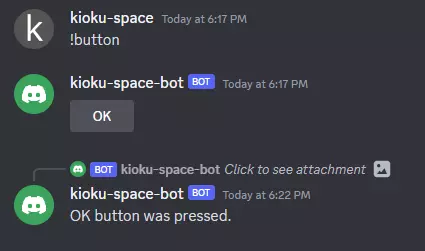
By default, the ui.View instance has a timeout of 180 seconds (3 minutes).
To remove this limitation, set timeout to None.
@commands.command(name='button')
async def button_command(ctx: commands.Context):
    """Sends a chat message that includes an 'OK' button."""
    view = ui.View(timeout=None)
    ...
2.5.2. Using edit_message for Responses
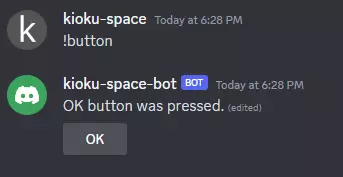
When the interaction.response.edit_message method is implemented as 2.3.2, the text of the original message where the button is placed will change to “OK button was pressed.”
2.5.2.1. Removing the Button
To remove the button from the message after it has been clicked, set the view option to None in edit_message.
class OKButton(ui.Button):
    ...
    async def callback(self, interaction: Interaction):
        await interaction.response.edit_message(content="OK button was pressed.", view=None)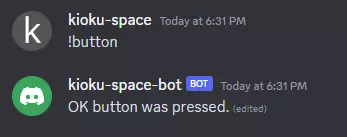
2.5.2.2. Disabling the Button
If you’d like to disable the button after it’s pressed, you can update the button’s status to ‘disabled’ and reflect this change in the message.
class OKButton(ui.Button):
    ...
    async def callback(self, interaction: Interaction):
        self.disabled = True
        await interaction.response.edit_message(content="OK button was pressed.", view=self.view)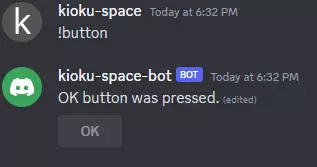
2.5.3. Using defer for Delayed Responses
When the interaction.response.defer method is implemented as 2.3.3, the bot will display a “thinking” status for 10 seconds before sending the final message.
2.6. Handling Multiple Responses in One Interaction
In Section 2.3, we discussed that a single interaction only allows for one response.
In the
callbackmethod, you are required to send only one response to the triggeredinteraction. You cannot send multiple responses, and the response must be returned within 3 seconds.
However, you might find situations where you’d like to perform multiple actions, such as “disabling the original message button while sending a reply.” How can you accomplish this?
This can be achieved using interaction.followup.
(Reference: Followup Messages, API Documentation)
The interaction.followup is valid for 15 minutes after the interaction occurs.
If you attempt to use it after this period, you’ll encounter the following error:
discord.errors.HTTPException: 401 Unauthorized (error code: 50027): Invalid Webhook Token(Reference: Followup Messages)
2.6.1 Sending Follow-Up Messages with interaction.followup.send
With interaction.followup.send, you can reply additional messages even after the initial response has been sent.
For example, you could use it to disable the original message button while also sending a reply, as demonstrated below:
class OKButton(ui.Button):
    ...
    async def callback(self, interaction: Interaction):
        self.disabled = True
        await interaction.response.edit_message(view=self.view)
        await interaction.followup.send(content="The OK button has been pressed.")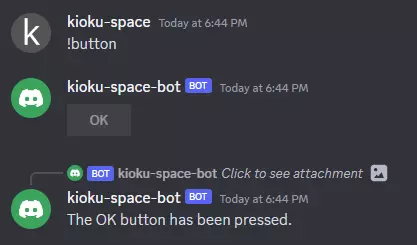
2.7. Editing Response Messages
You can use interaction.edit_original_response to edit messages that have already been sent as an initial response to an interaction.
(Reference: API Documentation)
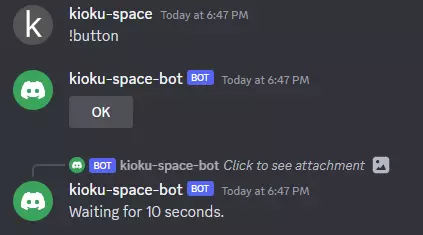
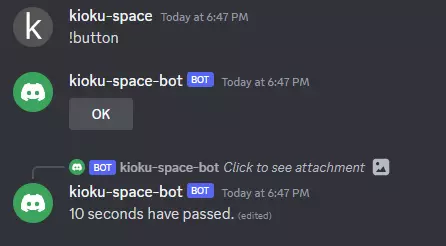
For instance, you can configure your bot so that a message saying, “Waiting for 10 seconds,” will automatically change to “10 seconds have passed,” after a 10-second delay.
import asyncio
...
class OKButton(ui.Button):
    ...
    async def callback(self, interaction: Interaction):
        await interaction.response.send_message(content="Waiting for 10 seconds.")
        await asyncio.sleep(10)
await interaction.edit_original_response(content="10 seconds have passed.")-
Upon button press
-
After 10 seconds
Conclusion
In this article, we’ve taken a deep dive into how to add buttons to messages and the types of responses that can be triggered when these buttons are pressed. In the next article, we’ll use this knowledge to add answer buttons to quiz question messages.